
mitsubishi mini split installation manual
Installing a Mitsubishi mini split system offers efficient heating and cooling solutions. With proper installation, these systems provide energy savings and aesthetic benefits. Ensure safety by following manual guidelines.
System Components and Tools Needed
The system includes an indoor unit, outdoor unit, refrigerant lines, and electrical components. Essential tools include a drill, wrench, vacuum pump, and multimeter for proper installation and testing.
Components
The Mitsubishi mini split system consists of several key components. The indoor unit includes the evaporator coil, fan, and air filters. The outdoor unit houses the compressor, condenser coil, and expansion valve. Refrigerant lines connect the indoor and outdoor units, enabling heat transfer. Electrical components such as the thermostat, circuit board, and wiring ensure proper system operation. Additional features may include remote controls, sensors, and drainage kits. The system also includes mounting brackets for secure installation. Proper handling and assembly of these components are crucial for efficient performance and safety. Each part must be compatible with the specific Mitsubishi model to ensure reliability and optimal functionality. Always refer to the manual for component specifications and compatibility guidelines to avoid installation issues. Correct installation of these components ensures energy efficiency, quiet operation, and long system lifespan.
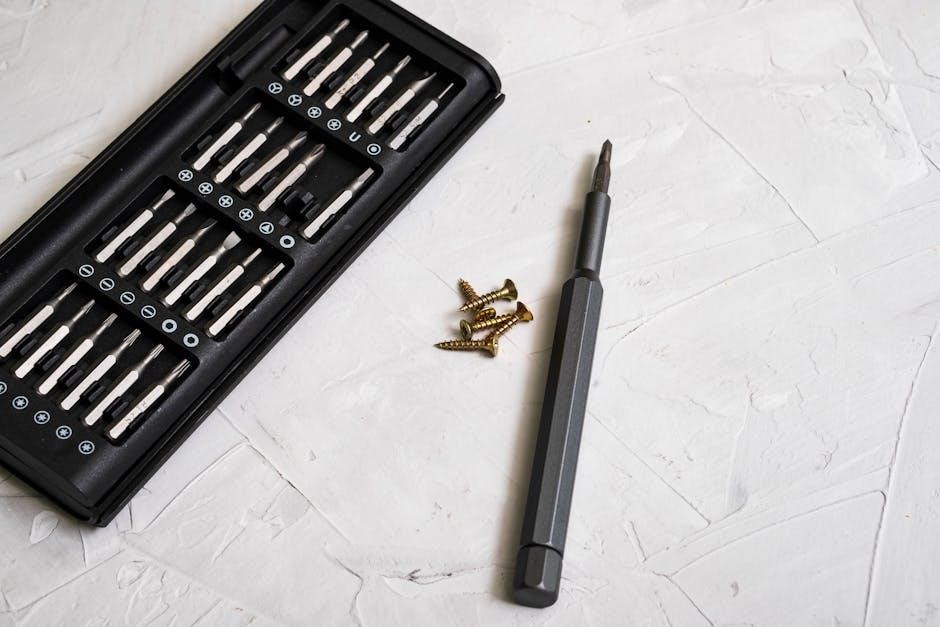
Tools
To install a Mitsubishi mini split system, you’ll need specific tools to ensure a safe and proper setup. A drill with drill bits is essential for creating holes in walls for refrigerant lines. A vacuum pump is required to evacuate the refrigerant lines, ensuring no air or moisture remains. Tubing cutters and flaring tools are necessary for preparing the refrigerant lines. A wrench set, including adjustable and Allen wrenches, will help with tightening connections. Electrical tools like wire strippers and pliers are needed for wiring. A manifold gauge set is crucial for checking refrigerant pressure. Safety gear, such as gloves and safety glasses, is a must. Additionally, a level ensures proper mounting of both indoor and outdoor units. A thermostat and remote control are included for system operation. Always use tools compatible with Mitsubishi systems to avoid damage. Proper tool usage ensures efficient installation and prevents potential hazards.
Pre-Installation Steps
Before installation, ensure the site is prepared and electrical requirements are met. Conduct an overnight pressure test and perform a three-step vacuum flush of refrigerant lines for quality control.
Site Preparation
Proper site preparation is crucial for a successful Mitsubishi mini split installation. Begin by selecting a suitable location for both indoor and outdoor units, ensuring adequate space and airflow. Clear the area of debris and obstructions. For the outdoor unit, choose a well-ventilated spot away from direct sunlight and heat sources to optimize performance. The ground should be level and stable to prevent vibration. For the indoor unit, select a wall strong enough to support its weight and ensure proper drainage. If installing a ceiling-mounted unit, verify structural integrity. Additionally, ensure all necessary tools and materials are within reach to streamline the process. Proper site preparation ensures safety, efficiency, and optimal system performance, aligning with best practices for mini-split installations.
Electrical Requirements
Ensuring proper electrical connections is critical for the safe and efficient operation of a Mitsubishi mini split system. A dedicated 20-amp circuit is typically required, depending on the system’s capacity. The circuit should be grounded and protected by a suitable breaker to prevent electrical hazards. Use appropriately sized copper wires, as specified in the manual, to connect the indoor and outdoor units. Avoid using undersized wires, as this can lead to overheating or system malfunction. The outdoor unit may require a 240-volt supply, while the indoor unit typically operates on 120 volts. Always consult the installation manual for exact voltage and amperage requirements, as these may vary by model. Proper electrical connections ensure safe operation, optimal performance, and compliance with local electrical codes. Improper wiring can lead to safety risks, reduced efficiency, or system damage.

Installation Steps
Mount the indoor and outdoor units securely, connect refrigerant lines, and establish electrical connections. Ensure proper alignment, sealing, and wiring to guarantee efficient and safe system operation.
Mounting the Indoor Unit
Mount the indoor unit on a sturdy wall, ensuring it is level and securely fastened. Choose a location with good airflow and access for maintenance. Drill pilot holes, insert wall anchors, and screw the unit into place. Ensure the unit is at least 7 feet above the floor for optimal performance. Avoid mounting near windows or doors to prevent drafts. Use a spirit level to confirm proper alignment. If installing in a garage or damp area, ensure the unit is protected from moisture. Tighten all screws firmly to prevent vibration and noise. Double-check the manufacturer’s manual for specific mounting height and location recommendations. Proper installation ensures efficient operation, reduced noise, and longevity of the system.
Mounting the Outdoor Unit
Mount the outdoor unit on a level, firm surface, ensuring proper clearance from walls and obstacles. Ideal placement is in a shaded, well-ventilated area to maximize efficiency. Use a concrete pad or sturdy base to support the unit’s weight and prevent vibration. Ensure the unit is at least 12 inches above the ground to protect it from water and debris. Maintain a minimum of 12 inches of clearance around the unit for airflow and maintenance access. Secure the unit firmly to the base using the provided hardware. Check the manufacturer’s manual for specific spacing requirements between the unit and nearby structures. Proper installation ensures efficient operation, reduces noise, and prolongs the system’s lifespan. Always follow safety guidelines and local building codes when mounting the outdoor unit.
Connecting Refrigerant Lines
Connecting the refrigerant lines requires precision to ensure proper system operation. Begin by evacuating the lines to remove air and moisture, using a vacuum pump and manifold gauge set. Once evacuated, carefully connect the refrigerant lines to the indoor and outdoor units, ensuring they are tightly sealed. Use the correct line sizing and insulation as specified in the manual to avoid pressure drops and energy losses. Avoid bending the lines excessively, as this can restrict refrigerant flow. After connecting, perform a pressure test to check for leaks; Properly insulate the lines to prevent condensation and energy loss. Ensure all connections are secure and meet the manufacturer’s specifications for optimal performance. Always follow safety guidelines when handling refrigerants and lines to avoid potential hazards.
Electrical Connections
Electrical connections are critical for the safe and efficient operation of your Mitsubishi mini split system. Begin by ensuring the power supply matches the unit’s requirements, typically a dedicated 20-amp circuit. Use a 2-pole breaker to protect the system, as it ensures both live wires are switched. Connect the indoor and outdoor units using the provided cables, securing them tightly to avoid vibration damage. Properly ground the system to prevent electrical shock and ensure compliance with local codes. Avoid using oversized breakers, as this can leave the system unprotected. Double-check all connections for tightness and insulation integrity. If unsure, consult a licensed electrician to ensure compliance with safety standards and manufacturer guidelines. Proper electrical connections are vital for system performance, efficiency, and safety. Always refer to the manual for specific wiring diagrams and voltage requirements.
Commissioning and Testing
Commissioning and testing are essential steps to ensure your Mitsubishi mini split system operates efficiently and safely. Start by powering on the system and checking for any error codes on the remote control or display. Test both heating and cooling modes to verify proper operation. Use a vacuum pump to ensure the refrigerant lines are free from leaks and moisture. Perform a pressure test to confirm the system holds the recommended refrigerant pressure. Inspect all electrical connections for tightness and ensure proper grounding. Check airflow from indoor vents to ensure balanced air distribution. Finally, verify that the system achieves the desired temperature settings efficiently. If any issues arise, consult the manual or contact a certified technician. Proper commissioning ensures optimal performance, energy efficiency, and longevity of the system. Always follow manufacturer guidelines for testing procedures to guarantee reliability and safety.
Maintenance and Troubleshooting
Regular maintenance is crucial to ensure optimal performance and longevity of your Mitsubishi mini split system. Clean or replace air filters every 1-3 months to maintain airflow and efficiency. Inspect and clean the outdoor unit’s condenser coils annually to prevent dirt buildup. Check the drain line regularly to avoid blockages and water leakage. For troubleshooting, consult the error codes displayed on the remote control or unit. Common issues include refrigerant leaks, faulty sensors, or improper installation. If the system doesn’t cool or heat effectively, ensure proper refrigerant levels and inspect for duct leaks. Noise issues may indicate loose mounting or debris near the unit. Always refer to the manual for specific guidance or contact a certified technician for complex repairs. Regular maintenance and prompt troubleshooting can prevent major issues and ensure reliable operation of your Mitsubishi mini split system.